Search This Blog

Friday, 16 December 2011

Confetti Popcorn

Well here it is.  The much anticipated Confetti Popcorn!  This is a recipe I found on a great blog - Nest of Posies.  

It is oh so good and easy to make.  

I originally make this for the kids, however, the adults quickly took over the treats -- they are that good!


All you need is three ingredients:  
  • Popcorn 
  • Wilton's Candy Melts 
  • M&M's
Pop the popcorn.


Melt the candy melts.


Pour the melted candy melts over the popcorn and mix well.

Add the M&M's.

And mix some more.

Lay out on parchment paper to dry.

Then package up! 


 You can find the full details at Nest of Posies --  Valentine Confetti  -- I love the idea of using different colour M&M's for different occasions.

I made these for our annual Christmas party, and as all our Christmas decorations are blue, I used just the blue ones!

This definitely is a keeper!


Now that's Creative!

Wednesday, 7 December 2011

Toffee Cake

Christmas baking is in full swing now.  Pecan Toffee made and packaged up, Shortbread cookies well on their way and now for the Toffee Cake.


This is an old family recipe from my husband's aunt.  It was given to me when we first started dating as a "test" -- well, I managed to make it and happy to say I passed the "test" despite the fact that the recipe was from England and the measurements and temperatures were all a little different...........All I have to say is thank God for Google, because I now know what gas mark 3 is!!!

This starts off with a shortbread like bottom, covered with home make toffee and topped off with chocolate.  It really is to die for, it is so rich and good.


Star off by creaming the butter til smooth

Add vanilla

 Add flour

Press in pan and bake 

Then, make the toffee

 Until nice and golden

Pour over crust

Melt chocolate and cover once toffee sets

Let chocolate set, cut and package up!!!

All ready for my Christmas Gift Baskets!
 

Now that's Creative!


Chocolate Bowl

Our Christmas party is fast approaching and I am always on the look out for new and different ideas.  I came across how to make a chocolate bowl.

It really had the WOW factor and thought I would fill it with chocolate covered strawberries.......yummy!!

Well, the instructions looked very easy and the end result was very elegant, so I thought I would give it a try.

Goal:
This is what the bowl SHOULD look like

Chocolate Bowl
Chocolate Bowl

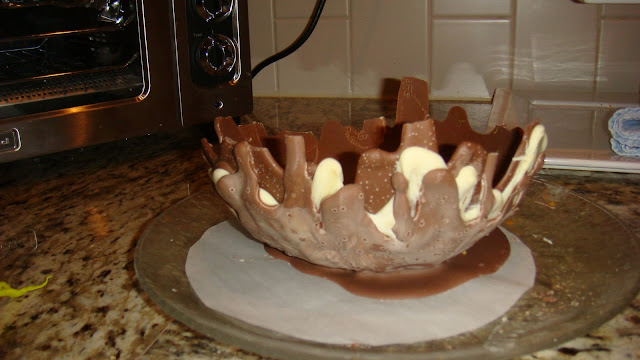
However, this was my disaster..............

Step 1:
Blow up your balloon and set it in a bowl.
Making Chocolate Bowl

Step 2:
Melt your chocolate and pour over the balloon so it drips down the sides.
Making Chocolate Bowl

Making Chocolate Bowl

Making Chocolate Bowl
Step 3:
Let the chocolate set, and do this a few more times alternating white chocolate with milk chocolate.

Step 4:
Create the base of the bowl.  Pour a good amount of chocolate and then invert the balloon on a piece of parchment paper to form the base of the bowl.
Chocolate Bowl
Chocolate Bowl
Step 5:
Once this fully sets, pop the balloon and the chocolate bowl will remain................Sounds so easy right?  Well, I need some practise on this one, as mine is a disaster!!
Chocolate Bowl
Chocolate Bowl

NOTES:
First off if you dare to attempt this, make sure your chocolate is cooled off once melted as it will pop the balloon if it is to warm!!!  I speak from experience on this one...........as you can see from the photos there is two different coloured balloons for this reason -- and melted chocolate splatters everywhere!!  But not to cool as it just globs down (like mine) instead of nice flowing steams as in the goal bowl.......


Second, do not let the balloon sit for a few day before popping it as I did.  You need the balloon to be "fresh" so when you poke it, it will actually POP!  Well, I waited til the next day and when I went to POP it -- it just deflated and took down the long chocolate fingers with it, ending up with a short stubby mess.......

Not sure if I will have enough time to try it out again this year or table it for next year to give it another go.  But I just love this look and you know I will attempt it again at some point.

Chocolate Bowl
Chocolate Bowl

If you dare to try this out let me know how it goes, any tips would be appreciated.

For complete instructions check out the professional work of art here:  How to make a chocolate bowl

Cheers!

Now that's Creative!


Thursday, 1 December 2011

Throw Pillows - white with blue ribbons

I am still working on the final touches of our bedroom makeover.  The window seat turned out fantastic, but I never got around to making the throw pillows for it. 


I have all the fabric and pillows just need to find the time to sew them.  With Christmas fast approaching I have put it into high gear and I am determined to complete the project this week.

This is the first set of pillows I will be making.  They are white with a navy blue ribbon detailing.


After cutting the fabric into 4 rectangles, I cut the ribbon into strips and marked the fabric as to where I wanted them to go. 


I then used fusing tape to attach the ribbons to the front of the pillow fabric.


I decided to put zippers in all the pillows I make, as it just gives it that final touch and a more professional look.  Plus if you ever need to wash them it really makes it a breeze.

Here is a little trick I learned (I am not much of a sewer, so this was new to me, however, you might already know this), put the zipper in first on what ever side seam you decided then finish all the other seams up.

The ribbons took a lot longer than I thought they would, but I think the extra effort and time was well worth it.  The pillow on it's own was just to plain. 


Look how great they look on my window seat.


Now that's Creative!